The Best Finish for Cornhole Boards: A Woodworking Guide
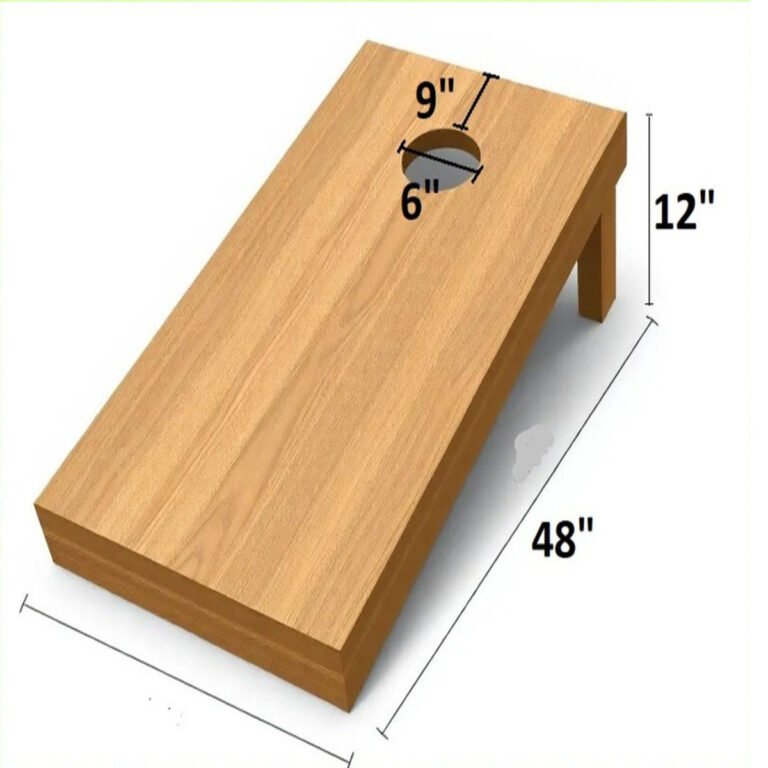
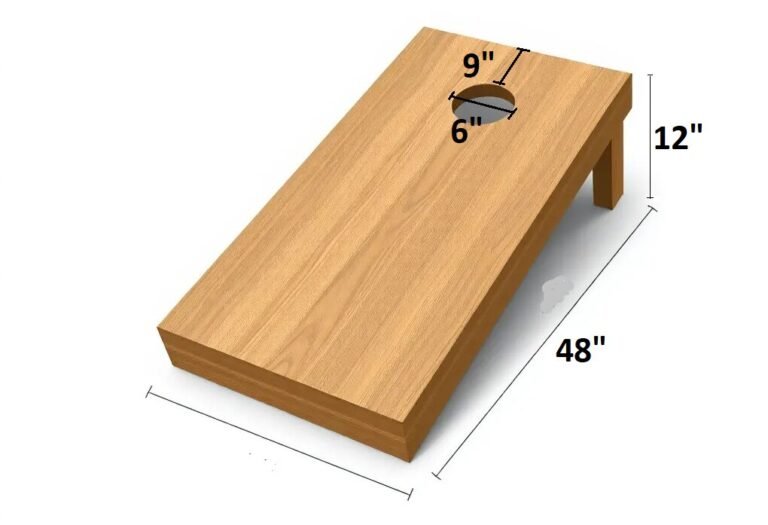
Cornhole is more than just a game—it’s a craft. Whether you’re building custom boards or maintaining store-bought ones, the finish for cornhole boards is critical for durability, gameplay performance, and aesthetics. A proper finish protects against weather, reduces bag bounce, and ensures your boards last for years. This comprehensive guide explores every aspect of cornhole board finishes, including types, application techniques, maintenance, and pro tips.
Why the Right Finish Matters
A quality finish isn’t just about looks—it’s functional. It:
- Protects wood from moisture, UV rays, and warping.
- Enhances gameplay by creating a smooth, consistent surface for bags to slide.
- Prevents splinters and cracks, ensuring safety and longevity.
- Adds customization through stains, paints, or glossy/matte coatings.
Types of Finishes for Cornhole Boards
Different finishes offer unique benefits. Below, we break down the most popular options:
| Finish Type | Pros | Cons | Best For |
|---|---|---|---|
| Polyurethane | Durable, water-resistant, UV protection | Can yellow over time; requires sanding | Outdoor/indoor boards |
| Epoxy Resin | Glass-like shine; ultra-durable | Expensive; tricky application | Premium/showcase boards |
| Marine Spare Urethane | Flexible, water resistant, resists humidity and temperature | Longer drying time | Outdoor boards |
| Marine Varnish | Superior waterproofing; UV resistant | Requires multiple coats | Coastal/humid climates |
| Tung Oil | Natural look; easy to reapply | Less durable; frequent maintenance | Indoor boards |
| Polycrylic Finish | Fast-drying; non-yellowing low odor | Not UV resistant; brittle over time | Decorative boards |
Key Considerations:
- Outdoor vs. Indoor: Spar urethane and marine varnish excel outdoors. Polyurethane is versatile.
- Aesthetics: Stains enhance wood grain; paints allow custom designs.
- Gameplay: A slightly slick surface (e.g., polyurethane) helps bags slide into the hole.
1. Polyurethane Finish
Polyurethane is the most commonly used finish for cornhole boards. It’s available in both water-based and oil-based forms.
Pros:
- Affordable and widely available
- Easy to apply with brush or spray
- Good durability and water resistance
- Available in gloss, semi-gloss, and satin
Cons:
- Oil-based has a stronger odor and longer drying time
- Can yellow over time (especially oil-based)
Quantity Needed: For two standard-size cornhole boards (2′ x 4′ each), you’ll need approximately 1 quart of polyurethane to apply 3–4 coats.
Recommended Polyurethane Products
| Product | Type | Finish | Price Range | Link |
|---|---|---|---|---|
| Minwax Fast-Drying Polyurethane | Oil-based | Gloss | $15–$17 | View Details |
| Varathane Ultimate Polyurethane | Water-based | Satin | $22–$24 | View Details |
| Rust-Oleum Triple Thick Polyurethane | Water-based | Gloss | $34–$38 | View Details |
2. Epoxy Resin Finish
Epoxy provides a high-gloss, glass-like finish. It’s ideal if you want your boards to stand out and have a professional look.
Pros:
- Super glossy and clear
- Resistant to scratches and water
- Adds depth and shine to painted designs
Cons:
- Expensive
- Tricky to apply (needs mixing and precise curing)
- Can yellow with UV exposure unless topcoated
Quantity Needed: One gallon of mixed epoxy resin (usually a 1:1 ratio of resin and hardener) is sufficient for 2 cornhole boards with 1 coat. For thicker applications or 2 coats, 1.5 gallons is ideal.
Recommended Epoxy Resin Products
| Product | Type | Coverage | Price Range | Link |
| Pro Marine Table Top Epoxy | 2-Part | 1 gal | $95–$102 | View Details |
| Dr. Crafty Clear Epoxy | 2-Part | 1 gal | $69–$75 | View Details |
| ArtResin Epoxy | 2-Part | 1 gal | $115–$125 | View Details |
3. Marine Spar Urethane Finish
Specifically designed for outdoor use, marine spar urethane is ideal for boards exposed to sunlight and moisture.
Pros:
- Excellent UV and water protection
- Flexible finish resists cracking in temperature changes
- Durable for all-season use
Cons:
- Longer drying time
- Slight amber tint (not ideal for light-colored designs)
Quantity Needed: Around 1 quart of spar urethane is enough for two boards with 3–4 coats.
Recommended Marine Spar Urethane Products
| Product | Type | Finish | Price Range | Link |
| Helmsman Spar Urethane by Minwax | Oil-based | Semi-gloss | $22–$25 | View Details |
| TotalBoat Gleam Spar Varnish | Oil-based | Gloss | $37–$42 | View Details |
| Rust-Oleum Marine Spar Varnish | Oil-based | Gloss | $20–$23 | View Details |
4. Marine Varnish Finish
Marine varnish is a heavy-duty finish made for harsh outdoor environments. It offers excellent protection against moisture and UV rays.
Pros:
- Exceptional UV and water resistance
- Flexible, resists cracking
- Perfect for permanent outdoor setups
Cons:
- Slower drying and curing
- Amber tint may affect color-sensitive designs
Quantity Needed: 1 quart is typically enough for 3–4 coats on 2 cornhole boards.
Recommended Marine Varnish Products
| Product | Type | Finish | Price Range | Link |
| Epifanes Clear Varnish | Oil-based | High Gloss | $33–$53 | View Details |
| TotalBoat Lust Marine Varnish | Oil-based | Gloss | $30–$45 | View Details |
| McCloskey Man O’ War Marine Spar Varnish | Oil-based | Gloss | $113–$120 | View Details |
5. Tung Oil Finish
Tung oil is a natural finish that penetrates deeply into the wood to enhance grain and provide a warm, matte appearance.
Pros:
- Natural, non-toxic, and eco-friendly
- Rich wood enhancement
- Easy to touch up and maintain
Cons:
- Not as durable as synthetic finishes
- Long drying time and multiple coats needed
- Requires maintenance for outdoor use
Quantity Needed: About 1 pint is sufficient for 3–5 coats on two boards.
Recommended Tung Oil Products
| Product | Type | Finish | Price Range | Link |
| Hope’s 100% Pure Tung Oil | Natural | Matte | $30–$35 | View Details |
| Minwax Tung Oil Finish | Blended | Low Sheen | $28–$30 | View Details |
| Real Milk Paint Pure Tung Oil | Natural | Matte | $83–$90 | View Details |
6. Polycrylic Finish
Polycrylic is a water-based option that’s easy to clean up and has minimal odor.
Pros:
- Fast-drying
- Low odor and easy cleanup
- Non-yellowing over time
Cons:
- Less durable than polyurethane
- Not ideal for outdoor use
Quantity Needed: 1 quart of polycrylic is typically enough for 2–3 coats on two standard cornhole boards.
Recommended Polycrylic Products
| Product | Type | Finish | Price Range | Link |
| Minwax Polycrylic Protective Finish | Water-based | Satin | $23–$25 | View Details |
Final Recommendation: What’s the Best Finish?
If you’re looking for a budget-friendly and versatile solution, go with polyurethane.
For a high-gloss, professional look, try epoxy resin (but be mindful of the cost and application).
If your boards stay outdoors, marine spar urethane is worth the investment.
For indoor boards or light use, polycrylic is a quick and clean choice.
Step-by-Step Guide to Applying a Finish
Follow these steps for a professional-quality finish:
Step 1: Surface Preparation – The Foundation of a Flawless Finish
A smooth base is critical for adhesion and longevity. Follow these steps:
- Initial Sanding:
- Start with 120-grit sandpaper to eliminate rough patches, scratches, or remnants of old finishes.
- Progress to 220-grit sandpaper, sanding parallel to the wood grain to avoid cross-grain scratches.
- Cleaning:
- Wipe away dust with a tack cloth. For stubborn debris, lightly dampen a lint-free rag with mineral spirits.
- Allow the board to dry completely (1–2 hours) before proceeding.
Why It Matters: Skipping this step traps debris, leading to uneven finishes and premature wear.
Step 2: Stain or Paint – Customize Your Design
Optional but recommended for aesthetics and wood protection.
A. Staining (For Natural Wood Grain)
- Application:
- Use a foam brush or lint-free cloth to apply stain in small sections.
- Immediately wipe excess with a clean cloth to prevent blotching.
- Drying:
- Let dry for 24–48 hours in a ventilated, dust-free area.
B. Painting (For Bold Designs)
- Technique:
- Use acrylic paint for weather resistance. Apply 2-3 thin coats to avoid drips.
- Lightly sand between coats with 320-grit sandpaper for a smooth base.
- Curing:
- Allow paint to cure for 48 hours before sealing.
Pro Tip: Masking tape ensures crisp edges for painted designs.
Step 3: Sealing – Protect Against the Elements
Choose between polyurethane for ease or epoxy for maximum durability.
A. Water-Based Polyurethane
- Application:
- Use a high-density foam brush to apply thin, even coats.
- Let dry 2–4 hours between coats.
- Sanding:
- Buff lightly with 320-grit sandpaper after each coat.
- Aim for 3–4 coats for a glass-smooth finish.
B. Epoxy Resin (Premium Durability)
- Mixing:
- Combine resin and hardener in a 1:1 ratio. Stir slowly for 3–5 minutes to minimize bubbles.
- Spreading:
- Pour onto the board and distribute evenly with a plastic squeegee.
- Remove bubbles by hovering a heat gun 6″ above the surface.
- Curing:
- Let cure 72 hours in a climate-controlled, dust-free room.
Key Consideration: Epoxy offers superior protection but may yellow over time with UV exposure.
Step 4: Non-Slip Finish (Optional)
Enhance gameplay safety with a textured surface:
- Mixing: Add 1 tbsp non-slip grit additive per 8 oz of polyurethane or epoxy.
- Application:
- Use a foam roller to apply the mixture, focusing on high-traffic zones (e.g., around the hole).
- Let dry fully before use.
Step 5: Curing – The Final Stage
- Ideal Conditions: Cure at 70°F–75°F with humidity below 50%.
- Timing: Avoid stacking or using boards until fully cured (refer to product labels for specifics).
Best Finishes for Outdoor Use
Prioritize UV resistance and flexibility to combat weathering:
- Marine Varnish:
- Apply 3 coats with a natural bristle brush. Reapply every 2 years for sustained UV protection.
- Spar Urethane:
- Ideal for cold climates due to superior flexibility. Thin with 10% mineral spirits for smoother application.
Maintenance & Longevity Tips
- Cleaning: Wipe with a dry microfiber cloth after use. For stubborn dirt, use mild soap and water.
- Refinishing: Lightly sand with 400-grit sandpaper and reapply polyurethane annually or as needed.
Common Mistakes to Avoid
- Rushing Sanding: Skipping grit steps creates uneven surfaces.
- Thick Coats: Causes drips and extends drying time.
- Ignoring Weather: High humidity or temperatures below 70°F hinder curing.
- Mixing Finishes: Never layer oil-based products over water-based finishes without proper sanding.
FAQs: Cornhole Board Finishes
Q: What’s the best finish to prevent bag bounce?
A: A semi-gloss polyurethane provides a slight tackiness to reduce bounce.
Q: Can I paint over polyurethane?
A: Yes, but sand the surface first and use a bonding primer.
Q: How do I make my boards waterproof?
A: Use 3+ coats of marine varnish or spar urethane, sealing all edges.
Q: Is epoxy resin too slippery for cornhole?
A: Yes, unless you add a non-slip additive to the final layer.
Q: Can I use car wax on cornhole boards?
A: Avoid wax—it creates an overly slick surface and wears off quickly.
Pro Tips for a Flawless Finish
- Test First: Try finishes on scrap wood to check color and texture.
- Use a Spray Gun: For ultra-smooth epoxy or lacquer applications.
- Edge Sealing: Pay extra attention to board edges, where moisture penetrates.
- Buff Between Coats: Use 0000 steel wool for a silky-smooth feel.
Eco-Friendly Finish Options
For environmentally conscious builders:
- Water-Based Polyurethane: Low VOC, dries quickly.
- Linseed Oil: Biodegradable but requires frequent reapplication.
- Beeswax & Mineral Oil: Food-safe, natural alternative for indoor boards.
Conclusion: Elevate Your Cornhole Game With the Perfect Finish
Choosing and applying the right finish for cornhole boards ensures they withstand years of play while looking sharp. Whether you opt for rugged spar urethane for outdoor battles or glossy epoxy for a showpiece set, this guide equips you to make informed decisions. Remember: a well-finished board isn’t just functional—it’s a statement of craftsmanship