DIY Cornhole Boards: Create Your Own with Easy Plans and Steps!
Crafting your own DIY cornhole boards is a fun and rewarding project that combines woodworking skills with a passion for the classic cornhole game. With the right materials, tools, and a step-by-step guide, you can create a personalized set that’s perfect for family gatherings, backyard games, or even competitive play. Whether you’re a beginner or an experienced woodworker, this guide will walk you through the process, complete with tips for a professional finish.
Getting Started with DIY Cornhole Boards
Building your own DIY cornhole boards is a fantastic weekend project that doesn’t require advanced woodworking skills. By following free plans and using basic tools, you can craft a set that’s regulation size, durable, and customized to your taste. This guide will provide everything you need to get started, from cutting the materials to finishing the boards with paint or stain.
Everything You Need to Build a Cornhole Board
Before diving into the construction process, gather these essential materials and tools:
Materials:
- Plywood sheets for the playing surface (preferably ½” thick).
- 2×4 lumber for the frame and legs.
- Screws, bolts, and washers for assembly.
- Wood glue for added stability.
Tools:
- Miter saw or circular saw for precise cuts.
- Drill and appropriate drill bits for pilot holes.
- Jigsaw or hole saw to cut the hole.
- Sander or sandpaper to smooth surfaces.
- Clamps for holding pieces in place during assembly.
Step 1: Preparing Your Materials
Start by preparing the plywood and lumber for your DIY cornhole boards. You’ll need:
- Two 2×4-foot plywood sheets for the playing surfaces.
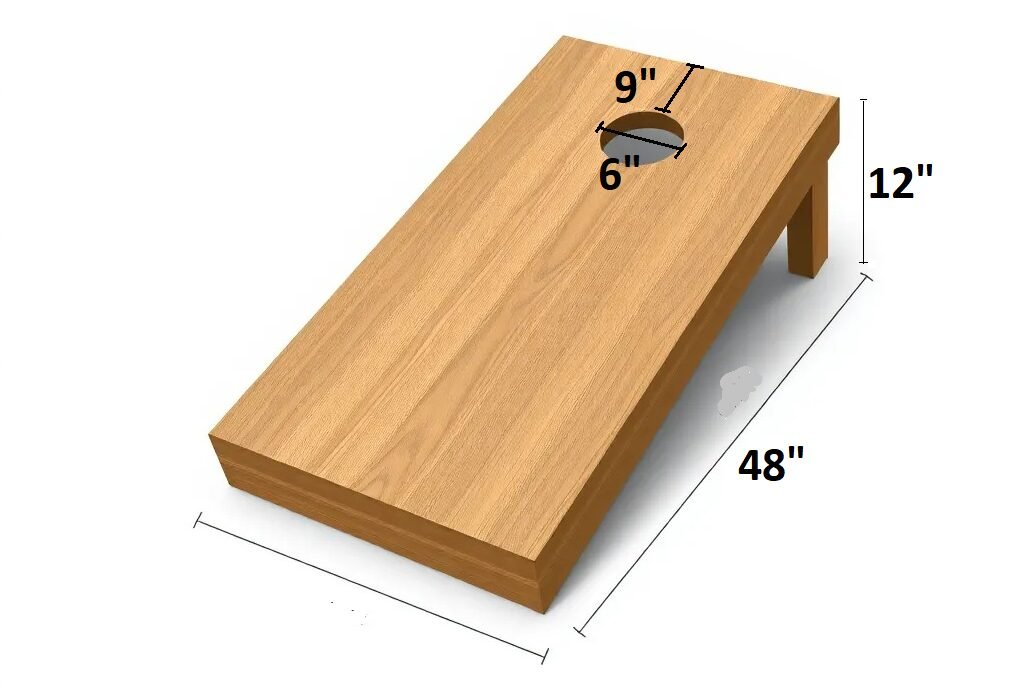
- Four 2x4s cut to 48 inches for the long sides of the frame.
- Four 2x4s cut to 21 inches for the short sides of the frame.
- Additional 2x4s for the legs, cut at an angle for proper support.
Step 2: Cutting the Plywood for the Playing Surface
Use a saw to cut a 4×8-foot sheet of plywood into two 2×4-foot sections. This creates the tops of your two cornhole boards. Ensure the cuts are perfectly straight to maintain a smooth edge for the frame assembly.
Step 3: Building the Frame
Steps to Assemble the Frame:
- Arrange the 2×4 lumber to form a rectangular frame.
- Secure the pieces with wood screws or nails. Use clamps to hold the frame in place while attaching the screws.
- Check that the frame is square and flush with the edges of the plywood top.
A sturdy frame is essential to keep the board stable during play and prevent wobbling.
Step 4: Making the Legs
The legs are critical for angling the board correctly. Here’s how to make them:
- Cut two 2x4s at a slight angle using a miter saw.
- Drill a hole through each leg and attach it to the frame using carriage bolts and washers.
- Test the angle to ensure the board stands at the correct height and stability.
Step 5: Drilling the Hole in the Plywood Top
The hole should be 6 inches in diameter and centered 9 inches from the top of the board. Use a compass to mark the circle and a hole saw or jigsaw to cut it out. Sand the edges of the hole to make it smooth.
Step 6: Sanding the Board for a Smooth Finish
Sanding is an essential step to ensure the cornhole bags slide smoothly across the board.
Sanding Tips:
- Use a sander or sandpaper with medium grit to remove rough edges.
- Finish with fine-grit sandpaper for a polished surface.
- Pay extra attention to the edges of the hole and the playing surface.
Step 7: Finishing Touches: Painting and Sealing
Once your boards are assembled, it’s time to add some personality:
- Painting: Use durable outdoor paint for bold colors or creative designs.
- Sealing: Apply polyurethane to protect the wood and create a smooth playing surface.
- Customization: Add decals or stencils for a unique look.
| Step | Description | Tools/Materials Needed |
| Step 1: Prepare Materials | Gather all necessary materials and tools to ensure a smooth building process. | Plywood sheets, 2×4 lumber, screws, wood glue, drill, clamps, miter saw, sander. |
| Step 2: Cut Plywood | Cut a 4×8-foot plywood sheet into two 2×4-foot sections for the playing surface. | Circular saw or table saw, tape measure, straight edge. |
| Step 3: Build the Frame | Assemble the frame using 2x4s to create a sturdy rectangular base for the board. | Screws, drill, clamps, wood glue, 2×4 lumber, tape measure. |
| Step 4: Make the Legs | Cut angled legs for stability and attach them to the frame using bolts and washers. | Miter saw, drill, carriage bolts, washers, nuts. |
| Step 5: Drill the Hole | Cut a 6-inch diameter hole 9 inches from the top edge of each board for the cornhole bags. | Cut a 6-inch diameter hole 9 inches from the top edge of each board for the cornhole bags. |
| Step 6: Sand the Board | Smooth all surfaces and edges to ensure the cornhole bags slide easily. | Sander or sandpaper (medium and fine grit). |
| Step 7: Paint and Seal | Apply paint or stain for design and finish with a protective coat to ensure durability. | Outdoor paint, polyurethane, paintbrush or roller. |
| Final Touches | Customize the board with decals or designs for a unique look and add cornhole bags. | Stencils, decals, cornhole bags. |
Why Build Your Very Own Cornhole Board?
There are many reasons to build your own DIY cornhole board:
- Cost-Effective: Save money compared to buying a pre-made set.
- Customizable: Add a personal touch with unique designs and colors.
- Durable: Use high-quality materials to ensure your boards last for years.
Building your own set also allows you to learn new skills and enjoy the satisfaction of completing a DIY project.
Bullet Point Summary
- Gather materials like plywood, 2×4 lumber, and screws before starting.
- Cut the plywood into two 2×4-foot sections for the playing surface.
- Build a sturdy frame using 2x4s and secure it with screws.
- Make angled legs with carriage bolts for proper height and stability.
- Sand the boards thoroughly to ensure a smooth playing surface.
- Finish with paint, polyurethane, and custom designs for a polished look.
By following these steps and using the right tools, you’ll have a high-quality cornhole board that’s perfect for backyard games or competitive play. Whether you’re creating a set for fun or showcasing your woodworking skills, this guide provides everything you need to succeed.


